

Documentation
All Whistleblowing System features explained simply
Whistleblowing System Documentation: How do I get started?
- Introduction
- Installation
- Forms Overview
- Form Fields
- Conditional Logic
- Multi-Step Form
- Headers
- Email Settings
- Display Options
- Form Settings
- Submissions
- Access Control
- Global Settings
- Designs
- Logs
Video Tutorial
This video provides a complete overview of the Whistleblowing System plugin and introduces its main features, functions, and configuration options.
Thank you for purchasing (PRO version) / installing (free version) and using the plugin. Before you begin, please read this documentation. We have covered all important topics and included the information you need to use the plugin.
If you cannot find the information you are looking for, please contact us at support@whistleblowing-form.de.
PRO
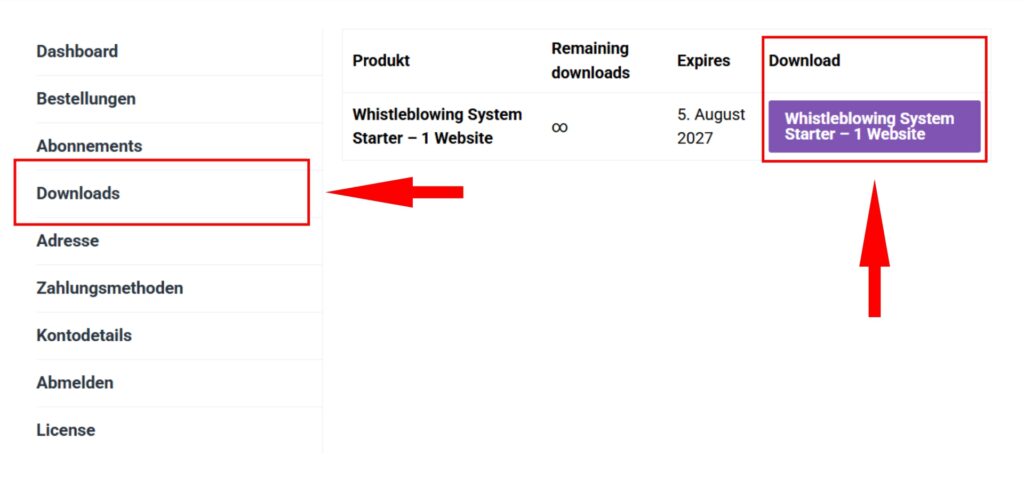
Go to your account dashboard and download Whistleblowing System.
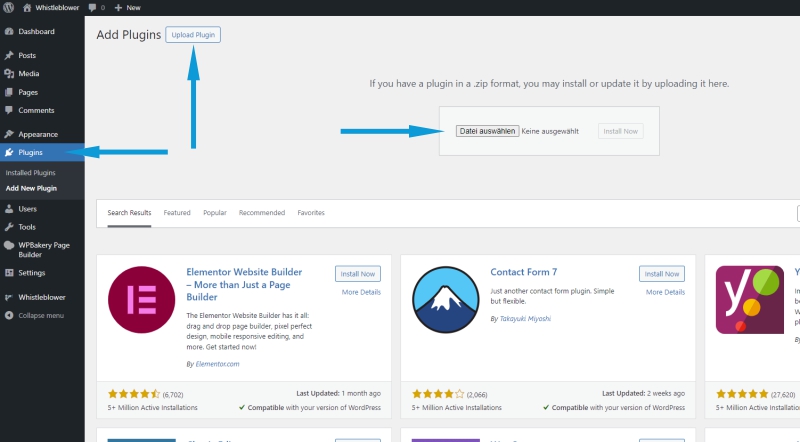
- In your dashboard, go to the Plugins menu item and click “Add New”.
- In the top bar, switch from “Search” to “Upload Plugin”.
- Select the ZIP file you downloaded previously under “Browse” and click “Install Now”.
- To use the plugin, you still need to activate it.
FREE
Install it via the dashboard or directly from the website.
- Open your dashboard and select the “Plugins” menu item. Then click “Add New”.
- Enter your search term (e.g. Whistleblowing, whistleblower, …) in the text field.
- After entering the search term, a list of results appears. Select the plugin and click the “Install Now” button.
- WordPress will ask you once more whether you really want to install it. As soon as you confirm the request, WordPress starts the installation.
- Finally, click “Activate” to start working with the plugin in WordPress.

Forms Overview
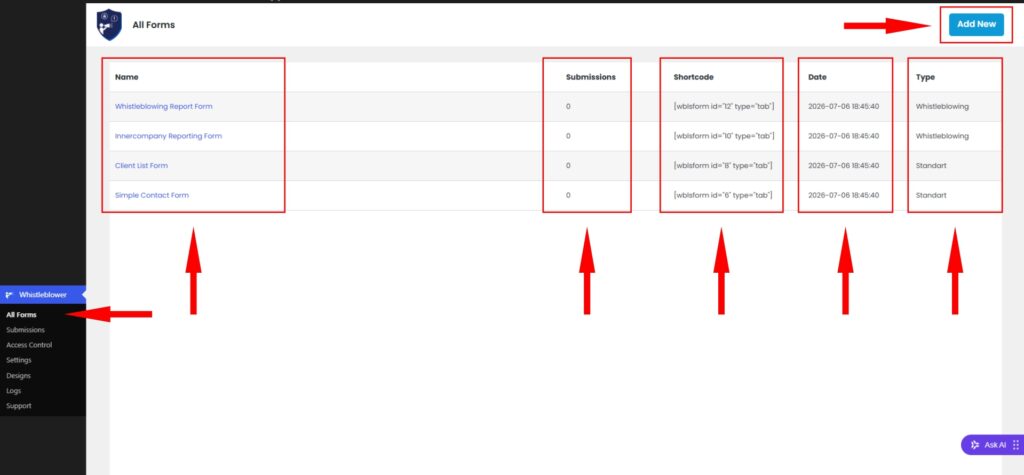
Under Whistleblower -> All Forms, you will find an overview of all created forms. Here you can manage existing forms, view the number of received submissions, and create new forms.
The overview contains the following information:
- Name: Name of the created form.
- Submissions: Number of submissions for the respective form. Clicking the number takes you directly to the related submissions.
- Shortcode: Individual shortcode of the form for embedding it on a WordPress page or in a post.
- Date: Date and time when the form was created.
- Type: Indicates whether it is a whistleblowing form or a standard form.
Managing Forms
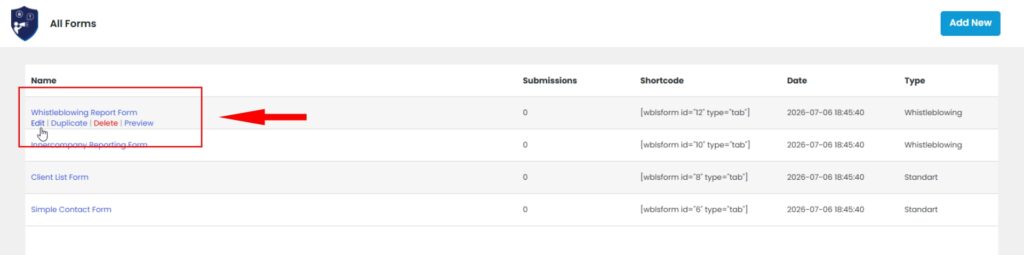
When you move the mouse pointer over the name of a form, the available actions appear:
- Edit: Opens the form for editing.
- Duplicate: Creates a copy of the form, including its fields and settings. Existing submissions are not copied.
- Delete: Deletes the form, including all related submissions and associated data.
- Preview: Opens a preview of the form.
You can create a new form via Add New.
Important: When a form is deleted, all related submissions, chats, attachments, and logs are also permanently deleted.
Form Fields
In the Fields area, you can add, edit, arrange, and configure the fields of a form with individual settings. In addition, conditional logic can be used to create dependencies between individual form fields.
This allows you to create both simple forms and extensive dynamic forms in which certain fields are shown or hidden depending on previous inputs.
Adding Form Fields
In the Add Fields area, various field types are available and can be added to the form.
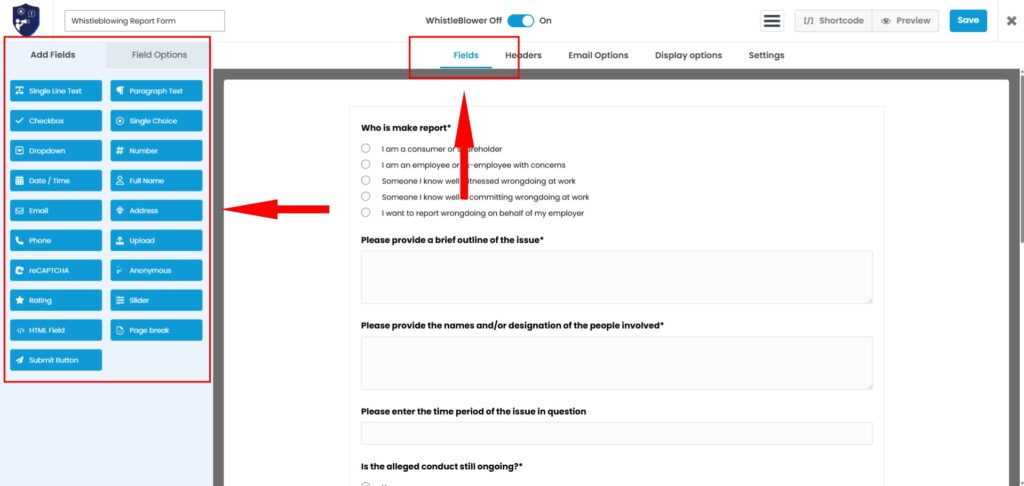
Clicking the desired field type adds the field to the end of the form.
The order is not fixed. Added fields can then be moved to the desired position within the form using Drag & Drop.
Editing Form Fields
Form fields that have already been added can be customized at any time.
When you move the mouse over a field, the corresponding icons for editing and deleting appear.
Clicking the edit icon opens the settings of the selected field on the left under Field Options.
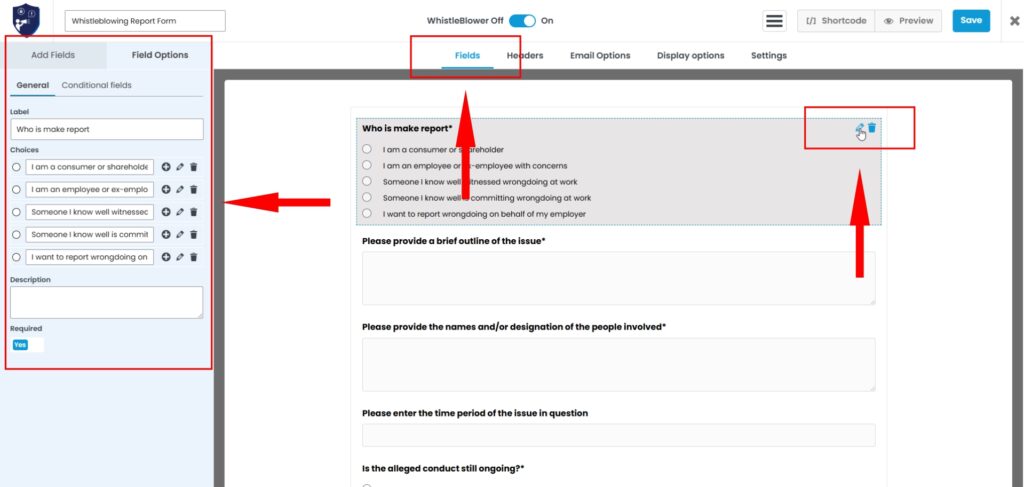
The available settings depend on the respective field type. This means that only the options required for the selected field are displayed.
Depending on the field, the following settings may be available, for example:
- Field label (Label)
- Description or additional notes (Description)
- Choices (Choices)
- Adding, editing, and deleting individual choices
- Marking a field as required (Required)
- Additional field-specific settings
A single-choice field, for example, requires settings for its various choices, while other field types provide their own corresponding options.
Deleting a Form Field
An unneeded field can be removed using the trash icon.
Before deletion, a confirmation prompt appears to prevent the form field from being removed accidentally.
Conditional Logic
With Conditional Fields, form fields can be automatically shown or hidden depending on the inputs in other fields.
This allows dynamic forms to be created that only show users the questions and input fields that are relevant based on their previous answers.
To do this, open the desired form field and switch to the Conditional Fields area under Field Options.
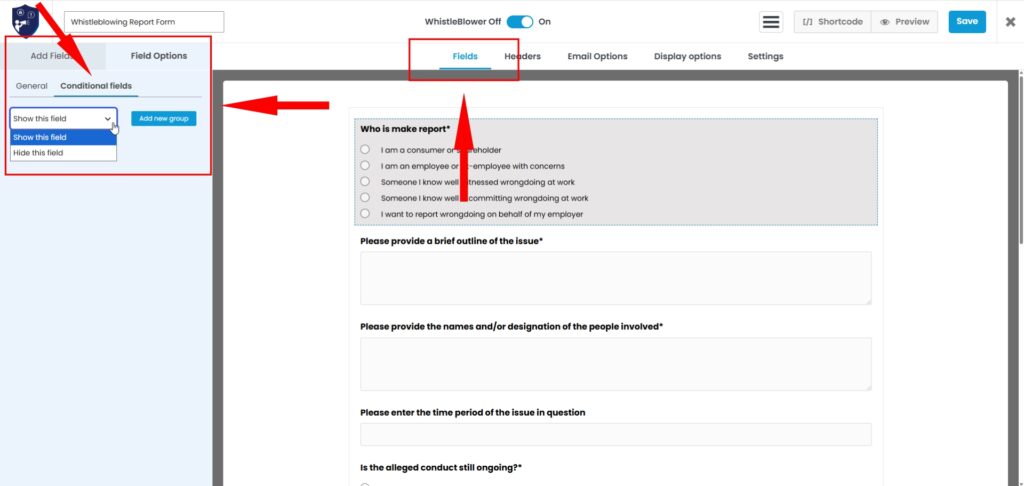
For the selected field, you can first define:
Show this field
The field is only displayed if the defined condition is met.
Hide this field
The field is hidden if the defined condition is met.
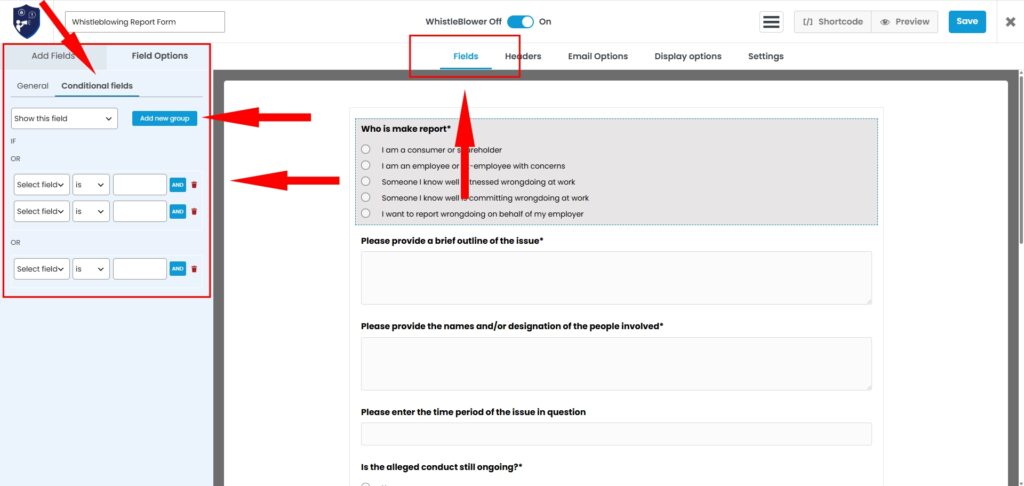
You then define which other form field the display should depend on. The possible conditions and comparison options depend on the field type used.
For example, the logic can be based on a specific text input or on the selection in a radio/single-choice field or a select/dropdown field.
With AND, an additional condition is added within the same group.
This means that all conditions connected with AND must be met for the group rule to apply.
With Add new group, a new OR group is added instead.
An OR connection applies between these groups. This means it is sufficient if one of the defined groups matches.
Video-Tutorial
Multi-Step Form
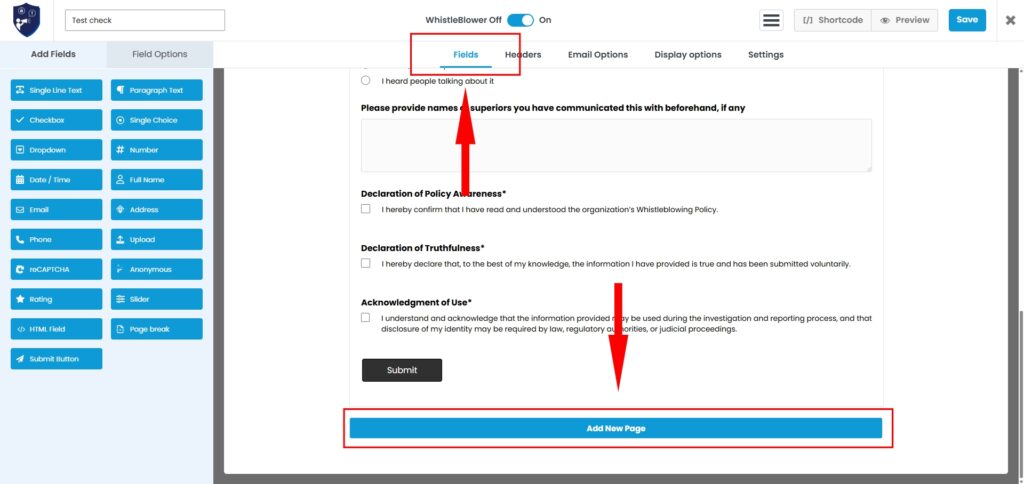
With the multi-step function, forms can be split across several pages. This also makes extensive forms easier to structure and complete step by step.
New pages are created in the Fields tab using the Add New Page button. Each page can contain any number of form fields.
After creating a new page, the desired form fields can be added as usual or moved to the corresponding page using Drag & Drop.
Page Settings
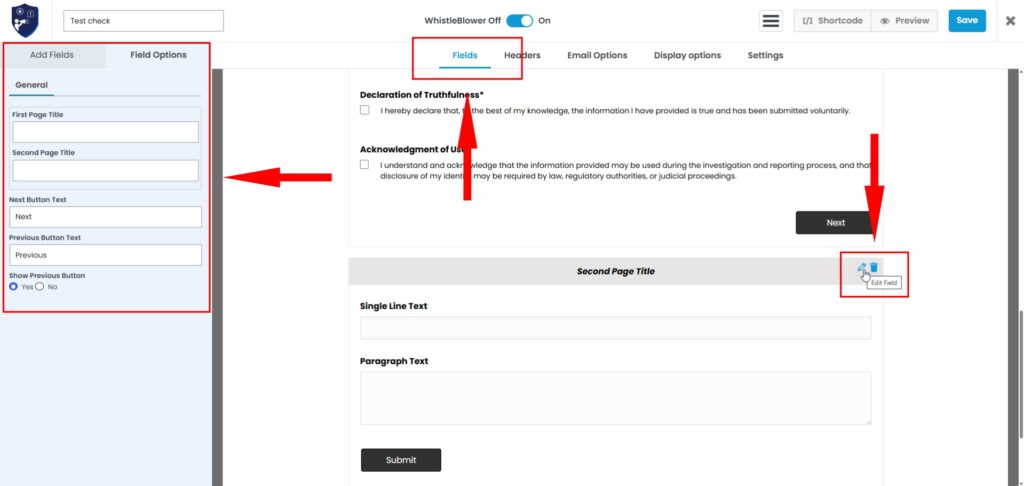
Each form page has its own settings, which are managed via Field Options.
The settings apply to the current page break and can be configured individually for each form page.
The following options are available:
- First Page Title – Title of the first form page.
- Second Page Title – Title of the next form page. A separate page title can be assigned for each additional form page.
- Next Button Text – Custom label for the button used to move to the next form page.
- Previous Button Text – Custom label for the button used to move back to the previous form page.
- Show Previous Button – Defines whether the “Previous” button should be displayed.
Conditional Logic with Multi-Step
The multi-step function is fully compatible with conditional logic.
Form fields can depend on each other even if they are located on different form pages. This allows you to create complex forms where inputs on a previous page influence the content of later pages.
Fields on a later page can also be used as conditions for form fields on subsequent pages.
Video-Tutorial
Header Texts
In the Headers area, individual texts can be stored for different areas of the form and for access to the case. The header texts can be defined separately for each form and enabled or disabled as needed.
A TinyMCE editor is available for editing and can be used to format the content. TinyMCE can also be enabled or disabled in the plugin’s global settings.
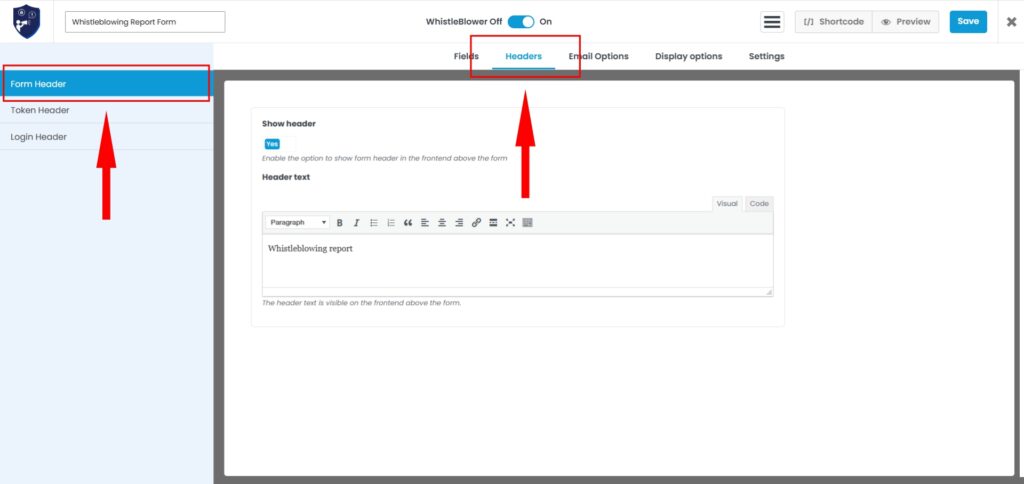
Form Header
The Form Header is displayed in the frontend above the actual form.
The display can be enabled or disabled for the respective form via Show header. The desired content can be entered in the Header text field and formatted using the editor.
This area is suitable, for example, for introductory information or notes that the user should read before filling out the form.
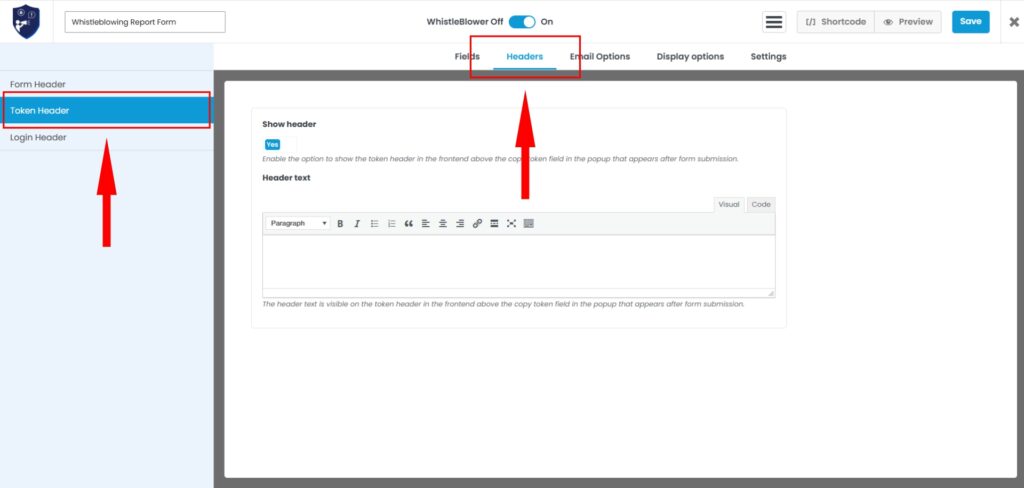
Token Header
The Token Header is displayed in the frontend after a case has been submitted. It appears in the token area above the field used to display or copy the generated token.
Important notes about the token can be entered here, for example that it should be stored securely because it is required for later access to the case.
The display can also be enabled or disabled via Show header, and the content can be defined individually via Header text.
Login Header
The Login Header appears in the frontend above the input field for the token on the login page or in the login area.
For example, notes about logging in or using the previously received token can be entered here.
The Login Header can also be enabled or disabled via Show header and customized using the editor.
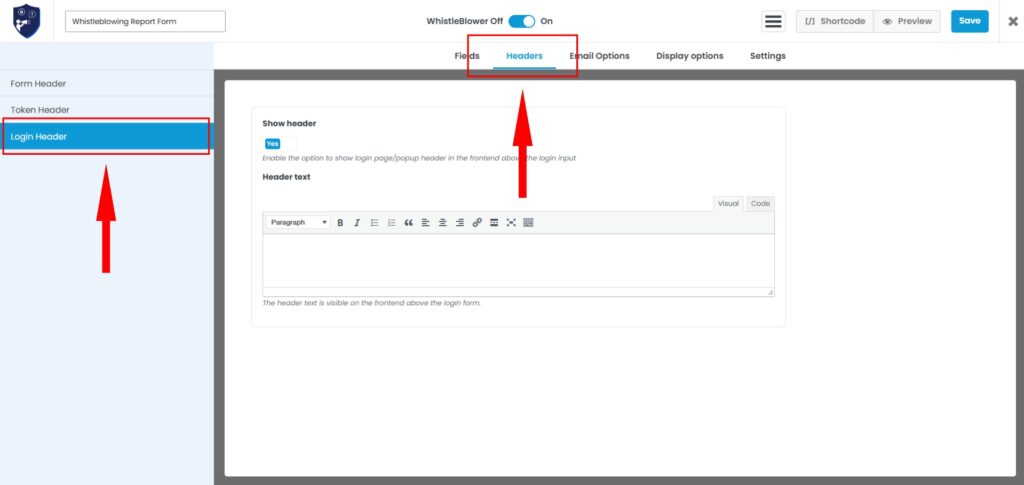
TinyMCE Editor
The TinyMCE editor is available for editing header texts. It can be used to format content and, for example, use paragraphs, emphasis, lists, or links.
The TinyMCE editor can be enabled or disabled in the global settings under Settings -> Advanced.
Video-Tutorial
Email Settings
The email settings define whether automatic notifications are sent after a form is submitted and who receives them. Recipients, sender, subject, and content can be configured individually and combined with dynamic values from the form.
Enable Email Notifications
Under Send Notification Email, email sending is generally enabled or disabled for the respective form.
If this option is disabled, no notification emails are sent for the form.
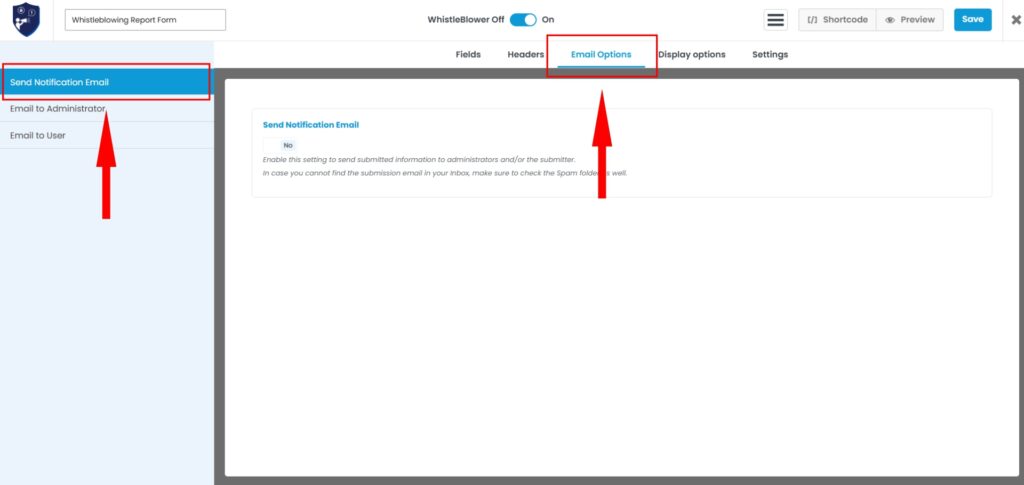
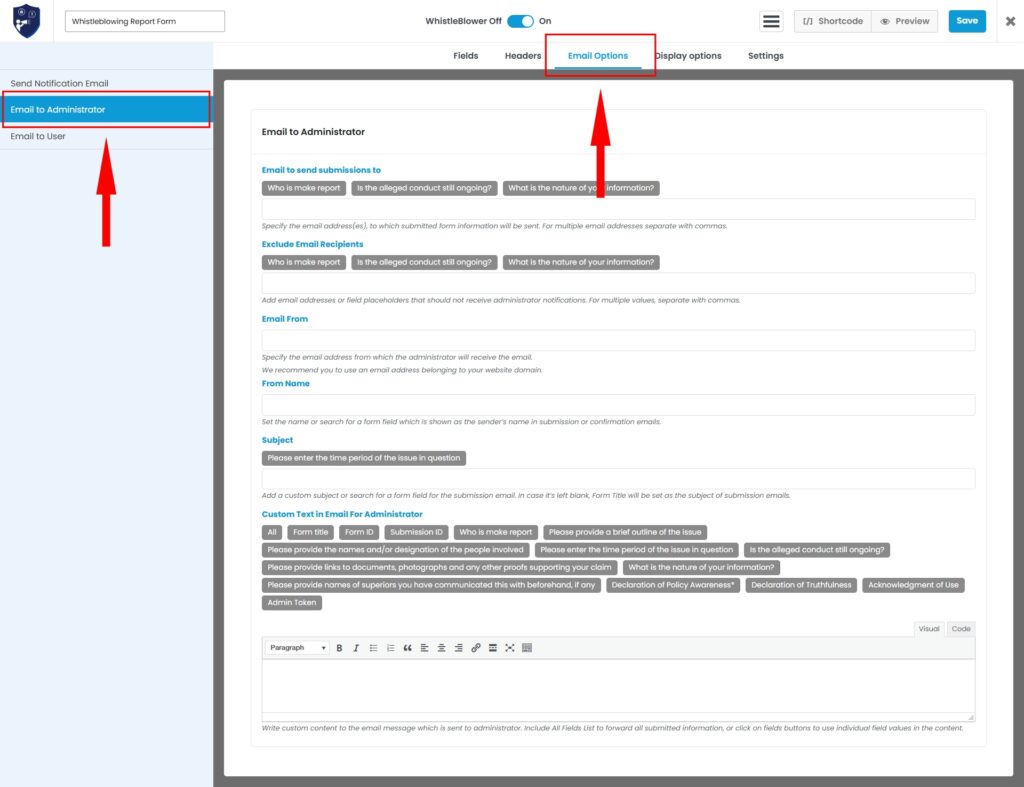
Email to Administrator
Under Email to Administrator, notifications to administrators or other responsible recipients are configured.
Define Recipients
Under Email to send submissions to, enter the email addresses to which a new case should be sent.
Multiple fixed email addresses can be entered separated by commas.
In addition, form fields can be used as dynamic values. For example, if a selection field contains an email address as its stored value, it can automatically be used as the recipient depending on the user’s selection.
This allows cases to be forwarded specifically to different people, departments, or areas of responsibility.
Exclude Recipients
With Exclude Email Recipients, specific recipients can be dynamically excluded from email sending.
This is useful, for example, if a form contains different departments of a company and a complaint concerns the selected department itself. The email address of that department can then be automatically excluded from sending via the selected field value.
Conversely, Email to send submissions to can be used to define that only the selected department receives the case and other departments are not notified unnecessarily.
Important: If the same email address is listed both under Email to send submissions to and under Exclude Email Recipients, the exclusion takes priority. No email is sent to that address.
This is especially important in the documentation. It helps users understand not only the technical function but also immediately what it is intended for.
Sender Address
Under Email From, the sender address of the notification is defined.
It is recommended to use an email address from your own website domain. This can reduce problems with email delivery.
If a different sender address should be used, the required settings must be coordinated with the hosting provider or the responsible IT department.
Sender Name
Under From Name, a fixed sender name can be entered or a form field can be used as a dynamic value.
If the field is left empty, the plugin automatically uses: Whistleblower
Subject
Under Subject, a custom subject can be entered or a form field can be used as a dynamic value.
If the field is left empty, the plugin automatically uses: Whistleblower new message
Administrator Email Content
Under Custom Text in Email for Administrator, the content of the notification can be assembled individually.
The available form fields are displayed above the editor and can be inserted directly into the email content. In addition, system information such as Form Title, Form ID, Submission ID, and Admin Token is available.
With All, all available form information can be included in the email.
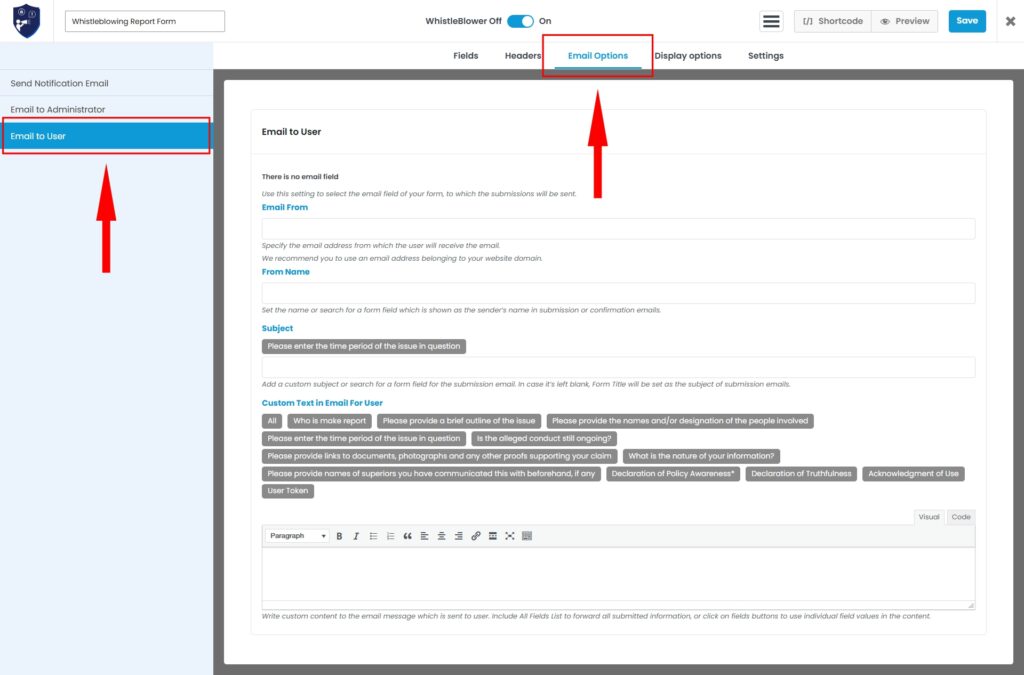
Email to User
Under Email to User, you can define whether the person submitting the form should also receive an automatic email.
Sending to the user can be enabled or disabled.
As the recipient, the plugin automatically uses the email address that the user entered in the form’s Email field.
If the form does not contain a corresponding email field, no recipient address can be determined for the user email.
Sender address, sender name, subject, and content can also be defined individually for this email.
Form fields can be used as dynamic values and inserted directly into the email content.
In addition, the User Token is available. This allows the personal access token, for example, to be sent directly to the user together with additional information.
Dynamic Form Values in Emails
I would add this short section as well, because this is a powerful feature that can otherwise easily be overlooked in the screenshots.
Form values can be used dynamically in different places in the email settings.
Depending on the setting, this can be used, for example, to:
- automatically determine recipients based on a form selection,
- exclude specific recipients from sending,
- apply sender names dynamically,
- use form values in the subject, and
- automatically insert submitted information into the email content.
This allows email notifications to be controlled flexibly based on the information entered in the form.
Video-Tutorial
Display Options
Under “Display Options”, you can define how the respective form is displayed in the frontend and which texts and content are shown to users. The settings apply only to the form currently being edited and can therefore be configured individually for each form.
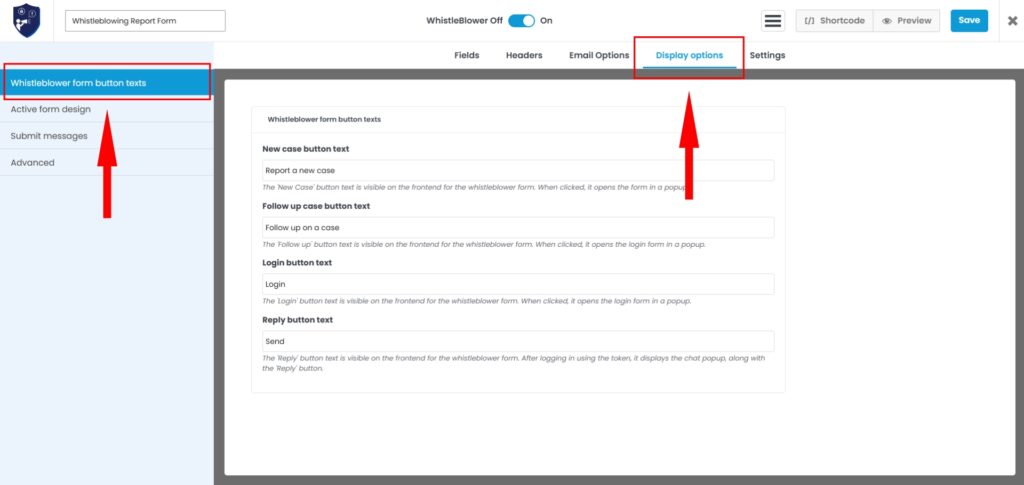
Button Texts
The labels of the most important buttons in the whistleblowing form can be customized. This allows the labels to be adapted to the language and purpose of the respective form.
The following button texts can be changed:
- “New case button text” – Button for creating a new case.
- “Follow up case button text” – Button for opening and following up on an existing case.
- “Login button text” – Button for logging in with the personal token.
- “Reply button text” – Button for sending a new message within the chat.
The changes made here apply only to the form currently being edited.
Active Form Design
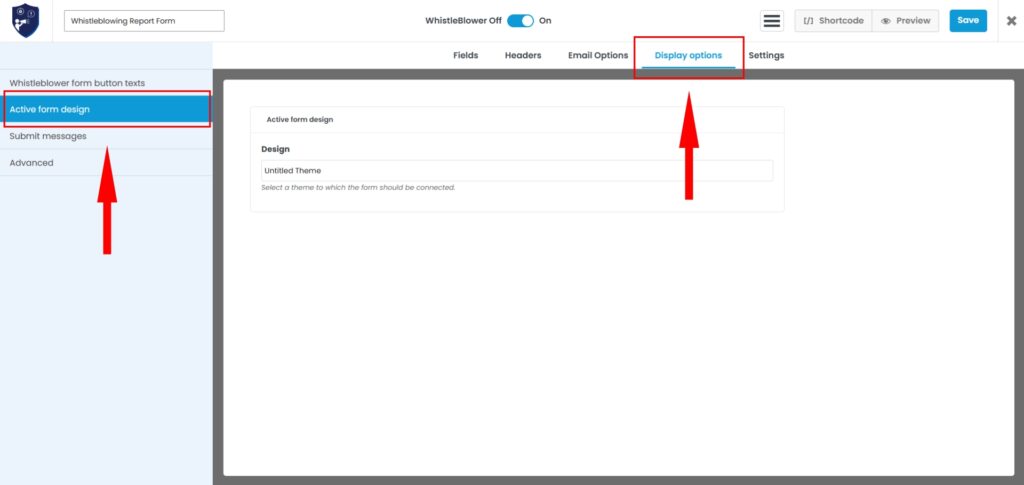
Under “Active form design”, a previously created design is assigned to the form.
Each form can have its own design selected. This allows different forms, for example, to be displayed with different colors, spacing, button styles, or other visual settings.
If the selected design is later edited under “Designs”, the changes are automatically applied to all forms to which this design has been assigned.
Creating and editing designs is described in more detail in the “Designs” documentation section.
Messages After Submission
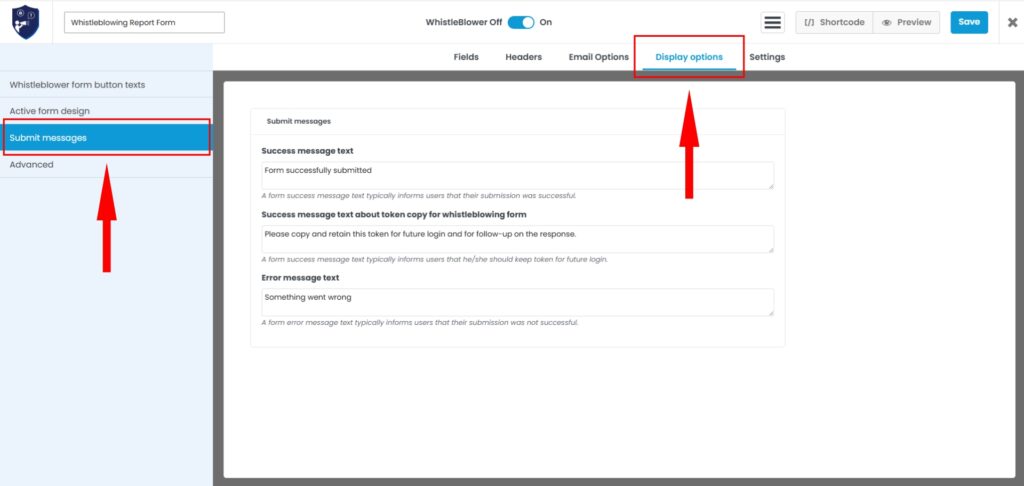
Under “Submit messages”, the system messages displayed after a form is submitted can be customized.
Success message text
This message is displayed when the form has been submitted successfully.
Success message text about token copy for whistleblowing form
For whistleblowing forms, a personal token is generated after successful submission. This text can be used to remind the user to copy the token and store it securely. The token is required for later access to the case and for further communication.
This setting only applies to whistleblowing forms.
Error message text
This message is displayed if the form could not be submitted successfully.
All texts can be customized individually for the respective form.
Advanced Display Options
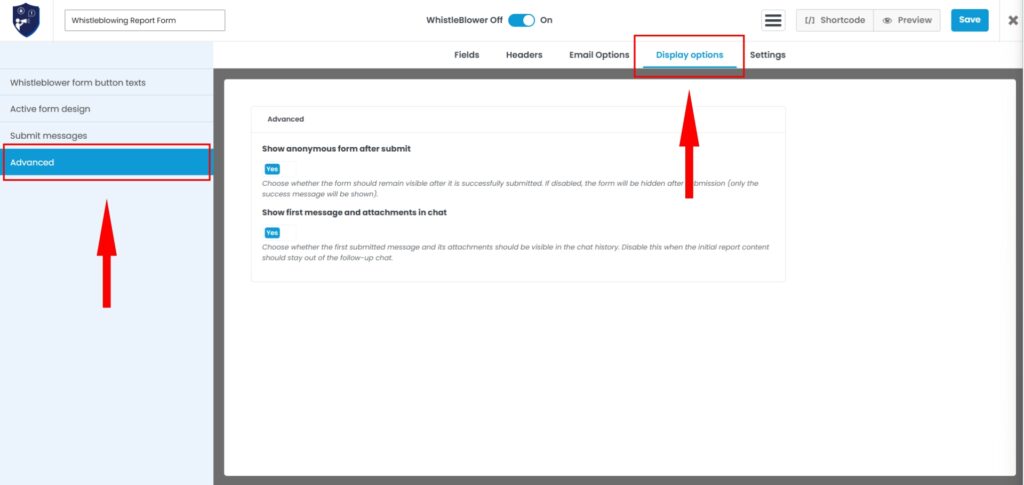
Under “Advanced”, additional settings are available for the behavior of the whistleblowing form after a case has been submitted.
Show anonymous form after submit
This setting defines whether the form should continue to be displayed after a successful submission.
If the option is enabled, the form remains visible after submission.
If the option is disabled, the form is hidden after successful submission. The success message and the area with the generated token remain visible.
This can be useful in particular to highlight the generated token more clearly after submission and prevent the user from immediately seeing the same form again.
Show first message and attachments in chat
This setting defines whether the sender can continue to access their original case and the submitted attachments via the chat after submission.
If the option is enabled, the first submitted message and the related attachments remain accessible to the sender in the chat.
If the option is disabled, the original message and its attachments are no longer accessible to the sender via the subsequent chat. Further communication about the case can still take place through the chat function.
A later change to this setting does not affect existing cases retroactively.
Form Settings
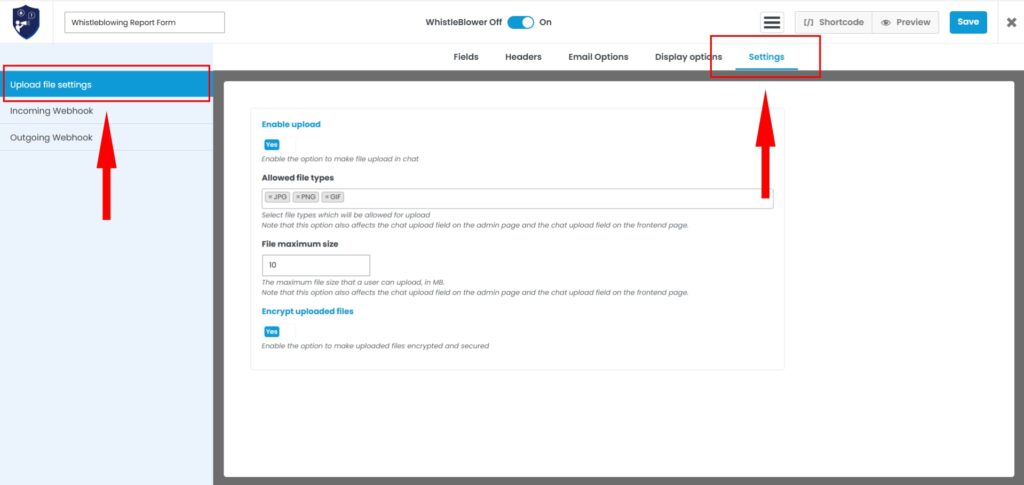
Under “Settings”, you will find the technical settings of the respective form. Here you can configure file uploads for the chat and set up incoming and outgoing webhooks for communication with external systems.
The settings apply to the form currently being edited.
Upload Settings
The upload settings define whether and under which conditions files may be uploaded within chat communication.
The settings apply only to the upload function in the chat. They do not control an upload field within the actual reporting form.
Enable Upload
File uploads within the chat can be enabled or disabled via “Enable upload”.
If the function is enabled, both users and administrators can upload files within the communication for a case.
Allowed File Types
Under “Allowed file types”, you define which file formats may be uploaded in the chat.
Multiple file types can be allowed. The defined file types apply both to uploads by the user in the frontend and to uploads by administrators in the backend.
Maximum File Size
Under “File maximum size”, the maximum permitted size of a single uploaded file is defined in MB.
This limit also applies to both users and administrators.
Encrypt Uploaded Files
With “Encrypt uploaded files”, uploaded files can be stored on the server in encrypted form.
If the function is enabled, the files are not stored in plain text. Encryption is performed server-side using AES-256-CBC. In addition, a SHA-256 hash is used to verify the integrity of the file during decryption.
When a permitted download is requested, the file is decrypted server-side and then provided.
Incoming Webhook
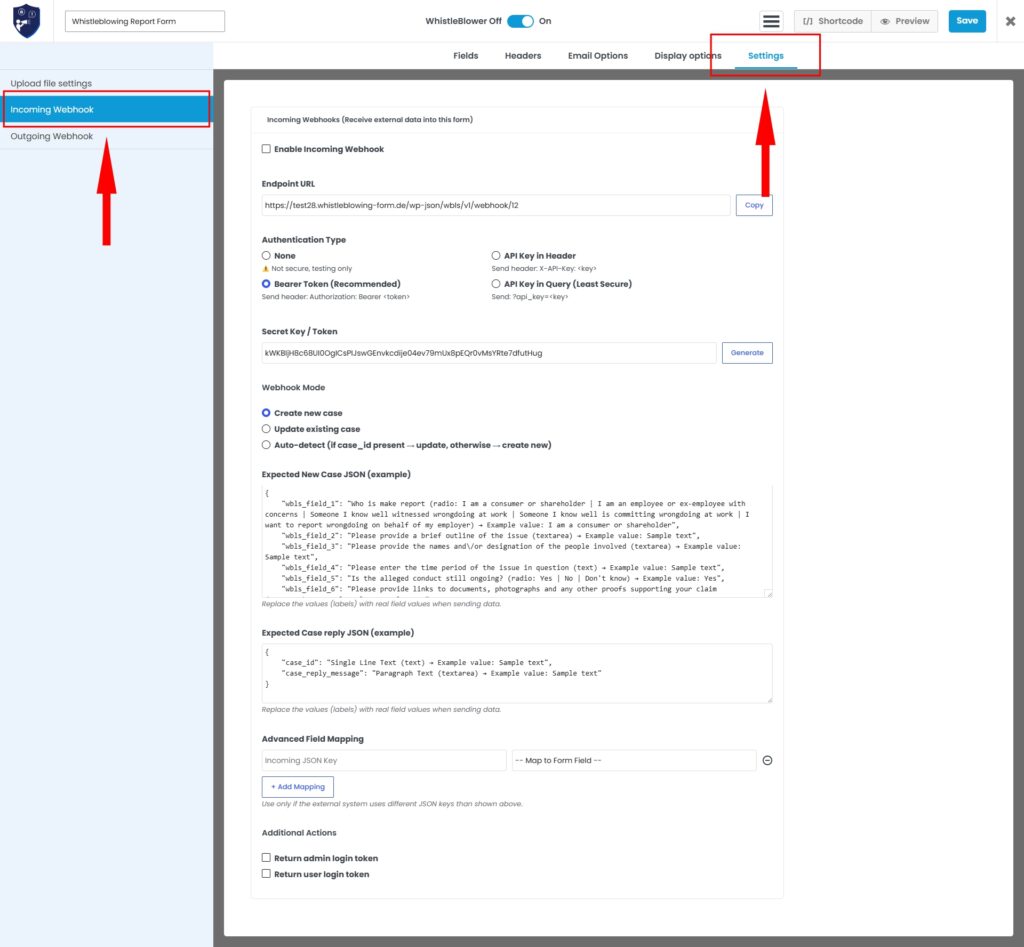
With the “Incoming Webhook”, external applications can transmit data to the Whistleblowing System. This can be used, for example, to create new cases from an external system or update existing cases.
Each form provides its own Endpoint URL to which the external system can send its data.
Screenshot: Place Form Settings 2 directly here. Since the screenshot is very long, I would display it as wide as possible.
Enable Incoming Webhook
The incoming webhook for the current form is enabled via “Enable Incoming Webhook”.
After activation, the displayed endpoint URL can be used by the external system to transfer data to this form.
Authentication
Different authentication options are available for accessing the endpoint:
- None
- Bearer Token
- API Key in Header
- API Key in Query
For production applications, using a Bearer Token is recommended.
With “Generate”, a corresponding secret key or token can be generated.
Webhook Mode
With “Webhook Mode”, you define how incoming data is processed.
Create new case
The transmitted data creates a new case. The submission is created in the Whistleblowing System like a regular case, and the required tokens are generated.
Update existing case
The data is assigned to an already existing case and updates it. For this, the corresponding case must be identifiable.
Auto-detect
The system automatically decides based on the transmitted data:
- If a
case_idis present, the existing case is updated. - If no
case_idis present, a new case is created.
Expected JSON Data
The system provides examples of the expected JSON structure directly in the settings.
Under “Expected New Case JSON”, it shows which data can be transmitted to create a new case.
Under “Expected Case reply JSON”, it shows the expected structure for communication with an existing case.
The displayed sample values must be replaced with the actual data from the external system in the real request.
Advanced Field Mapping
With “Advanced Field Mapping”, JSON keys from an external system can be mapped to the corresponding form fields of the Whistleblowing System.
This is especially helpful if the external system uses different field names.
For example, an external JSON key such as department can be mapped to the corresponding department field of the form. This means the existing data structure of the external system does not need to be adapted to the plugin’s internal field names.
Return Login Tokens
Under “Additional Actions”, you can define whether additional tokens should be returned in the response after the request has been processed.
Return admin login token
Returns the administrator token generated for the relevant case to the external system.
Return user login token
Returns the user token of the case to the external system. This token can then be used to access and continue communication about the case.
Because these are access credentials, these options should only be used if the receiving system and the transmission are secured accordingly.
Outgoing Webhook
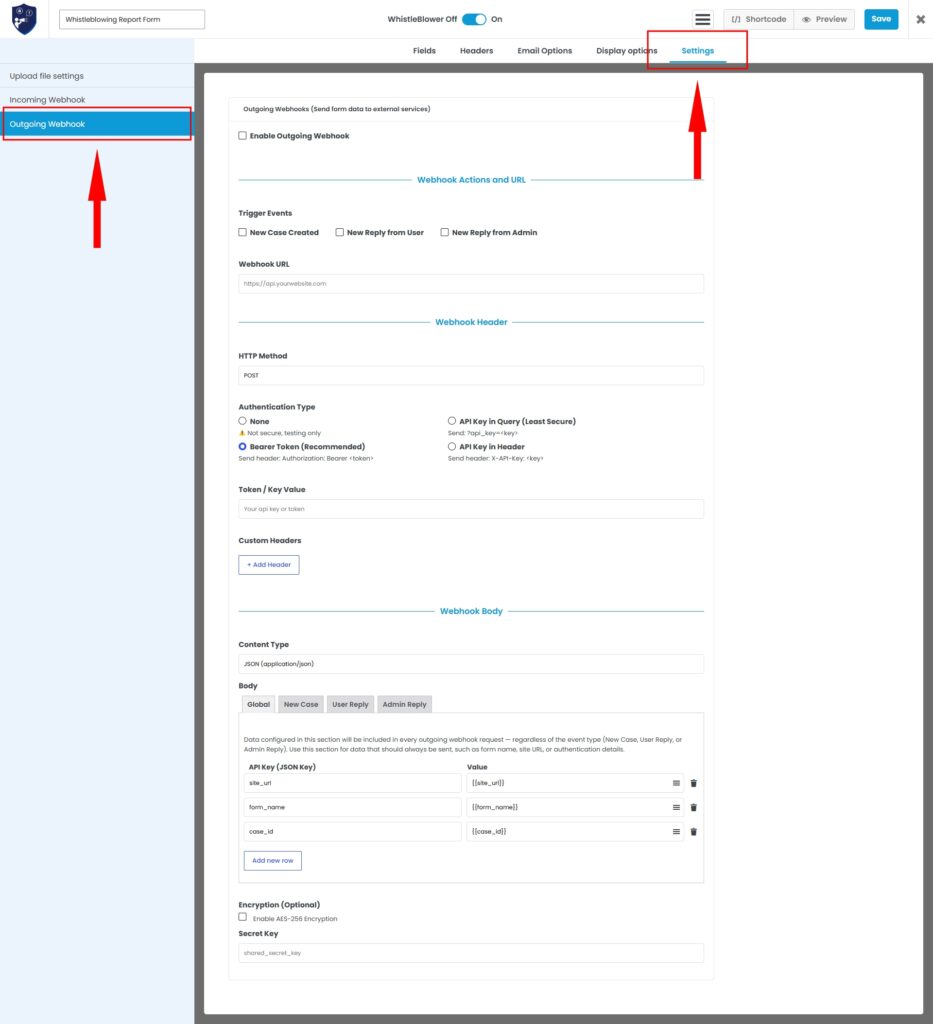
With the “Outgoing Webhook”, data from the Whistleblowing System can be transmitted automatically to external applications.
This makes it possible, for example, to connect internal systems, case management solutions, or custom interfaces with the plugin.
Trigger Events
You can define which events should trigger a webhook:
New Case Created – when a new case has been created.
New Reply from User – when the user sends a new message for an existing case.
New Reply from Admin – when an administrator sends a new message.
Multiple triggers can be enabled at the same time.
Webhook URL and HTTP Method
Under “Webhook URL”, enter the address of the external endpoint to which the data should be sent.
The desired HTTP method can also be defined. This means the function is not limited exclusively to POST requests.
Authentication
Different authentication options are available for connecting to the external endpoint:
- None
- Bearer Token
- API Key in Query
- API Key in Header
In addition, further required HTTP headers can be defined via “Custom Headers”.
Which authentication method must be used depends on the API or external system that receives the webhook data.
Webhook Body
The content of the webhook can be assembled individually.
Four areas are available for this:
Global
Contains data that is transmitted with every triggered webhook.
New Case
Additional data for the “New Case Created” event.
User Reply
Additional data for a new reply from the user.
Admin Reply
Additional data for a new reply from an administrator.
The global values are therefore always combined with the values of the respective event.
For example:
Global + New Case
Global + User Reply
Global + Admin Reply
Available Values
Available values from two groups can be used for the webhook body:
Form fields
Here, the form fields available for the respective form can be selected, for example:
- Single Line Text
- Dropdown
- Single Choice
Which fields are displayed depends on the structure of the respective form.
Others
In addition, system-related values are available, including:
- Site URL
- Form name
- Form ID
- Case ID
- Event type
- Reply message
- User token
- Admin token
This allows both the form information submitted by the user and technical information about the form and the respective case to be passed to the external system.
I would place your two new small screenshots directly next to each other here. This is much better than two large images one below the other: Available values: “Form fields” | “Others”
This helps the user immediately understand where the values for the webhook body come from.
API Key / JSON Key
An API or JSON key is defined for each transmitted value. This key is then assigned one of the available values from “Form fields” or “Others”.
This allows you to determine under which key information is transmitted to the external system in the webhook.
For example, the Case ID can be transmitted under a suitable JSON key, while another key contains the value of a specific form field.
Webhook Body Encryption
Optionally, AES-256 encryption can be enabled for the outgoing webhook.
If encryption is enabled, the webhook body is encrypted before transmission. The receiving system needs the corresponding secret key to decrypt the transmitted data again.
Encryption should therefore be coordinated with the technical implementation of the receiving system.
Failed Webhooks
Currently, failed outgoing webhooks are not logged in the plugin’s Logs area.
I would deliberately include this sentence. Otherwise, technically experienced users in particular might assume that failed requests automatically appear under “Logs”.
Managing Submissions
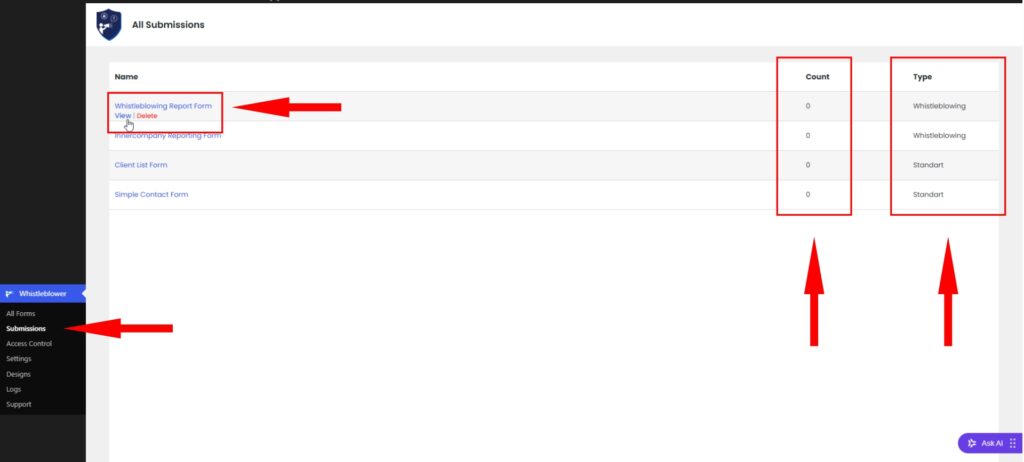
All cases received through the forms can be managed centrally in the “Submissions” area. The overview shows all forms for which submissions can be stored.
For each form, the form name, the number of received cases, and the form type are displayed. A distinction is made between whistleblowing forms and standard forms.
The submissions of the respective form can be opened via “View”.
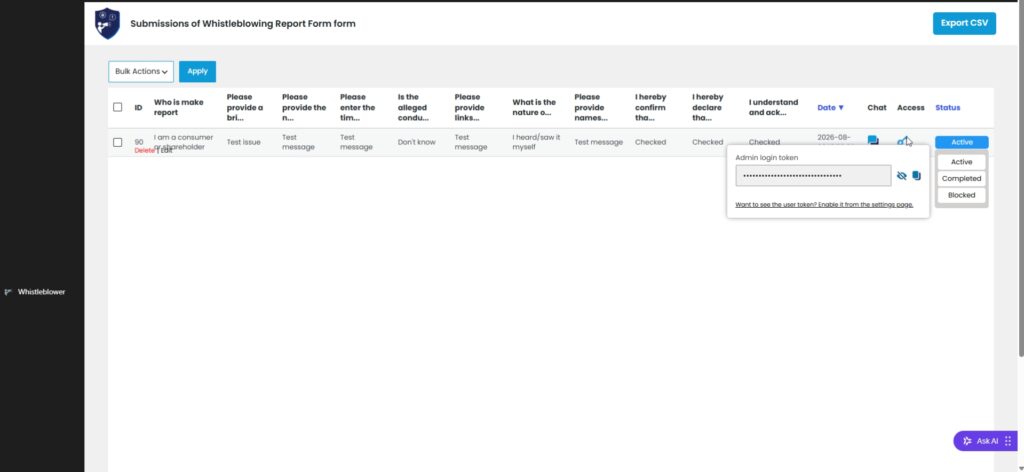
Submission Overview
After opening a form, the related submissions are displayed in a table overview. The submitted form values are shown as individual columns according to the fields used in the form.
From here, individual or multiple submissions can be managed, the respective status can be changed, the chat can be opened, and the access credentials of a case can be viewed.
Managing Multiple Submissions
With “Bulk Actions”, multiple submissions can be edited at the same time. To do this, select the desired submissions using the checkboxes and then execute one of the available actions.
The following actions are available:
- Delete – delete selected submissions
- Activate – set selected submissions to “Active”
- Block – set selected submissions to “Blocked”
- Complete – set selected submissions to “Completed”
Before deletion, a confirmation prompt appears before the final deletion takes place. When a submission is deleted, the complete case and the associated data such as chat messages, attachments, and tokens are deleted.
Status of a Submission
Each case can have one of the three statuses “Active”, “Completed”, or “Blocked”. The status can be changed directly in the submissions overview and adjusted again at any time if needed.
“Active” indicates an active case. The whistleblower can see the current status in the frontend and continue sending messages.
“Completed” indicates a case completed from the company or processor side. The whistleblower sees that the case has been completed but can still send messages via the chat.
“Blocked” blocks further communication by the whistleblower. The status of the case remains visible to them, but they can no longer send additional messages.
Chat
The related chat can be opened directly in the WordPress administration area via the speech bubble icon of a submission.
Administrators can view the communication and existing attachments there and reply directly to the whistleblower. Logging in via the frontend area with a token is not required for this.
Access to the Case
The access information for the respective case can be opened via the access icon. The Admin Login Token can be displayed and copied.
With this token, the corresponding case can be accessed via the frontend area without requiring WordPress backend access.
By default, the User Token does not need to be displayed at this point. If the whistleblower’s token should also be visible, this can be enabled in the global plugin settings under “Advanced”.
After activation, the User Token can also be viewed in the Access area.
Exporting Submissions
With “Export CSV”, the submissions of a form can be exported as a CSV file.
Video-Tutorial
Access Control
Access Control can be used to assign individual access rights to WordPress users. This allows you to define exactly which user may access which forms and plugin functions.
Permissions can be assigned for individual or multiple forms and adjusted at any time. Users without a corresponding access rule have no access to the protected areas of the plugin.
Select User
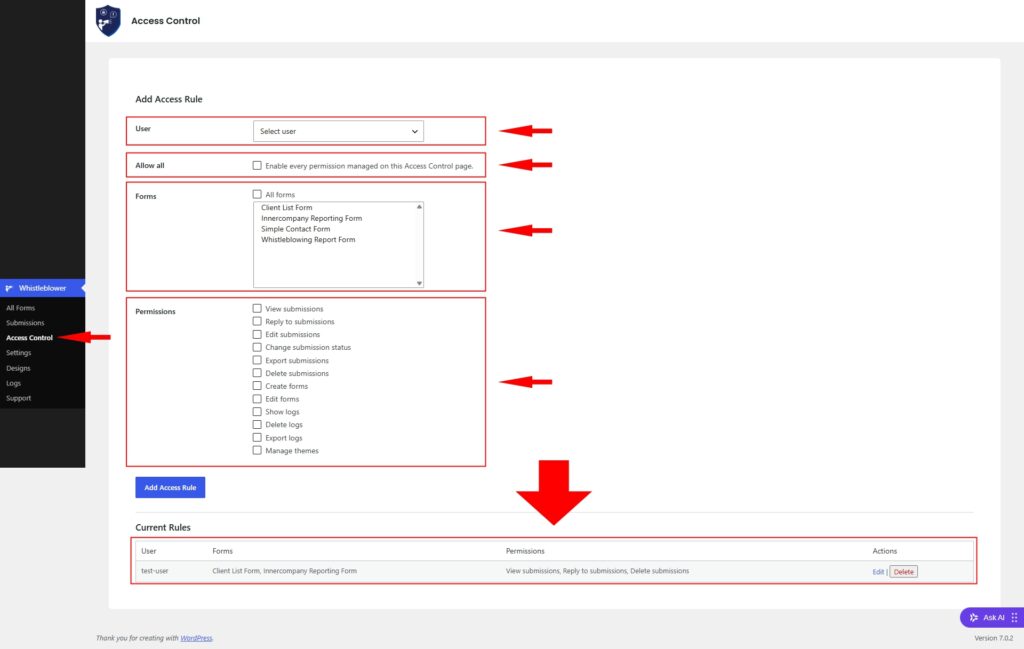
Under “User”, select the WordPress user for whom an access rule should be created. All existing WordPress users can be selected. A specific WordPress user role is not required for this.
The access rights are then controlled directly through the plugin’s Access Control settings.
Define Access to Forms
Under “Forms”, define which forms the permissions should apply to. A single form or multiple forms can be selected at the same time.
With “All forms”, the access rule applies to all forms. This also includes forms that are created at a later time.
This allows different employees or departments, for example, to receive access only to the forms that are relevant to them.
Define Permissions
For each user, you can define individually which functions they may use within the selected forms.
The following permissions are available:
- View submissions – view submissions
- Reply to submissions – reply to submissions
- Edit submissions – edit submissions
- Change submission status – change the status of a submission
- Export submissions – export submissions
- Delete submissions – delete submissions
- Create forms – create new forms
- Edit forms – edit forms
- Show logs – view logs
- Delete logs – delete logs
- Export logs – export logs
- Manage themes – access the “Designs” area and its settings
The form-related permissions apply to the forms assigned to the corresponding access rule.
The “Edit submissions” function is described in a separate section.
Grant All Permissions
With “Allow all”, all permissions available through Access Control can be granted at once. The rule applies to all forms.
This is useful, for example, if a user should receive full access to the functions managed through Access Control.
Create and Edit Forms
With the “Create forms” permission, a user may create new forms. A form created by this user can then also be edited by the same user, as long as their access rights are not changed accordingly afterward.
Access to editing assigned forms can be controlled via “Edit forms”.
Access to Designs
With “Manage themes”, the user receives access to the “Designs” page. There, they can view and change the existing design settings.
This allows access to form design to be granted independently of other plugin functions.
Multiple Access Rules for One User
Multiple access rules can be created for the same WordPress user. The permissions assigned in them are combined.
This allows very targeted access concepts to be created. For example, a user can only view and reply to submissions for one form, while receiving additional permissions for another form.
This makes it possible to configure different rights per form for individual users.
Managing Existing Access Rules
Rules that have already been created are displayed under “Current Rules”. There, the user, the assigned forms, and the granted permissions are visible at a glance.
An existing access rule can be adjusted later via “Edit”. The corresponding rule is removed via “Delete”.
When an access rule is deleted, only the assigned access rights are removed. The WordPress user, the forms, and existing submissions remain unchanged.
Managing Existing Access Rules
Rules that have already been created are displayed under “Current Rules”. There, the user, the assigned forms, and the granted permissions are visible at a glance.
An existing access rule can be adjusted later via “Edit”. The corresponding rule is removed via “Delete”.
When an access rule is deleted, only the assigned access rights are removed. The WordPress user, the forms, and existing submissions remain unchanged.
Global Settings
Global plugin settings are managed in the “Settings” area. These settings apply to all forms and control central functions such as reCAPTCHA, license management, logging, and general plugin settings.
Every change is applied to all forms after saving.
reCAPTCHA
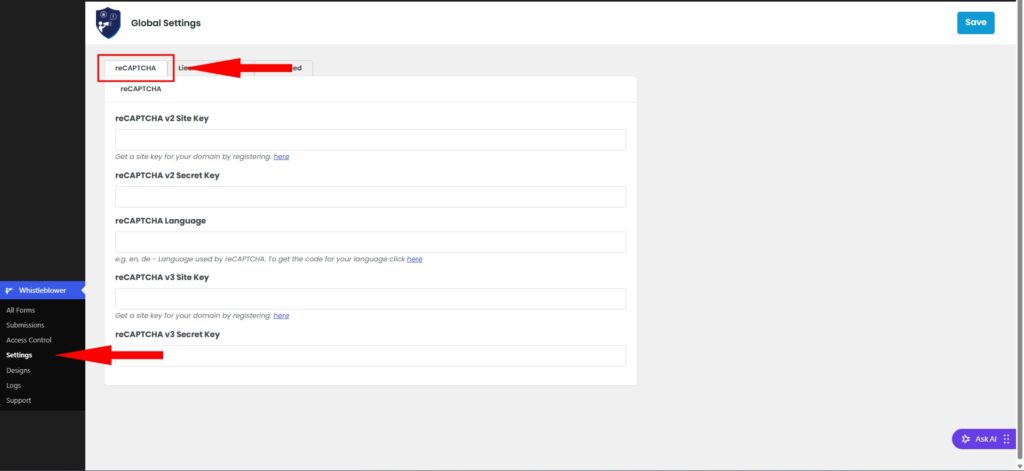
The plugin supports Google reCAPTCHA v2 and v3 to protect against spam and automated form submissions.
Configure reCAPTCHA
For the desired version, the corresponding Site Key and Secret Key must be entered.
The following are supported:
- reCAPTCHA v2
- reCAPTCHA v3
Both the Site Key and the Secret Key are always required for the version used.
Define Language
The language of the widget can be defined via the “reCAPTCHA Language” field.
Enter the corresponding language code, for example:
- de
- en
- fr
- es
If no language settings are configured, Google automatically uses the visitor’s language.
Validity
The reCAPTCHA configuration is global and is used for all forms.
License
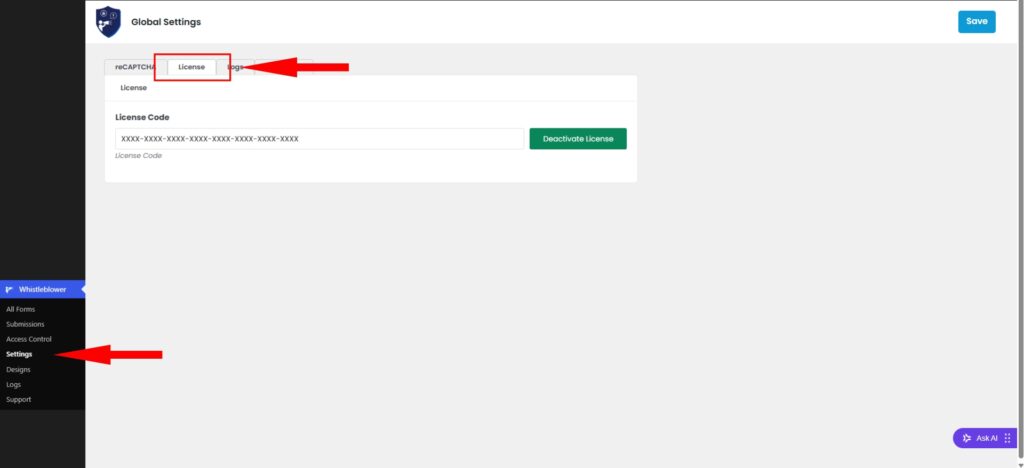
License management is used to activate or deactivate the PRO version.
Activate License
To activate the license, enter the license key you received into the license field and save it.
After successful activation, all PRO features are available.
Deactivate License
An active license can be deactivated again at any time.
This is especially helpful if the license was initially used on a development or test environment and should then be transferred to the live website.
Logs
Automatic logging of important plugin activities is managed in the “Logs” area.
Enable Logging
Logging can be enabled or disabled via “Logs Active”.
Only relevant actions related to the communication and management of a case are stored.
These include, for example:
- New Case
- Case Reply
- Status Changed
- Form Deleted
- Submission Deleted
- Incoming Webhook
- Outgoing Webhook
Automatic Deletion
With “Auto-delete logs after”, you can define after how many days older logs are automatically deleted.
The value:
- 0 = logs are never deleted automatically.
All other values specify the retention period in days.
Advanced Settings
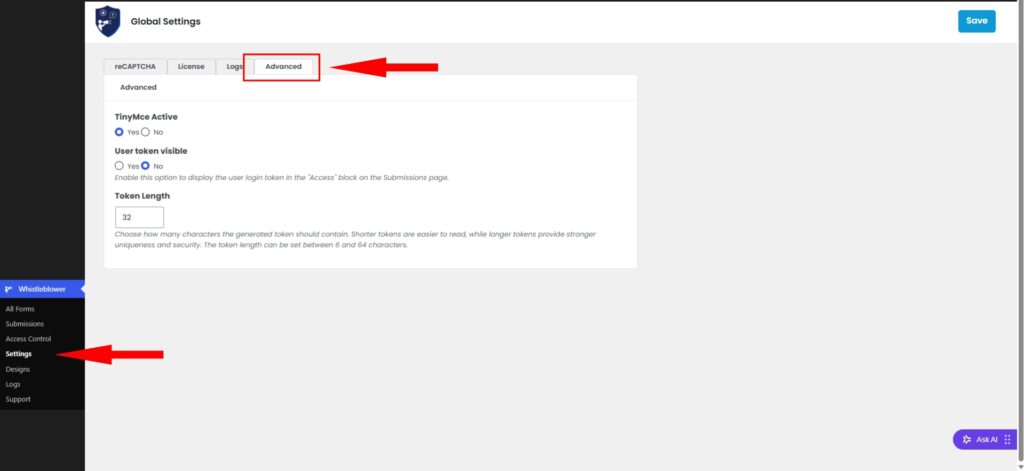
Additional global plugin settings are located in the “Advanced” area.
TinyMCE Editor
The integrated editor can be enabled or disabled via “TinyMCE Active”.
If the function is enabled, convenient formatting options are available in the corresponding areas.
If TinyMCE is disabled, simple text fields are shown instead.
Show User Token
With “User token visible”, you can define whether the User Token should also be displayed in the “Submissions -> Access” area.
By default, only the Admin Login Token is displayed there.
This option affects only the display in the administration area.
Token Length
With “Token Length”, the length of newly generated login tokens can be defined.
The token length can be selected between 6 and 64 characters.
Longer tokens increase security and make it harder to guess a token.
A change only affects newly created cases. Existing tokens remain unchanged.
Designs
In the “Designs” area, individual design templates for the forms can be created and managed. Any number of designs can be created and then assigned to the desired forms.
A new design template is created via “Add New”. An existing design can be edited or deleted. In the “Default” column, you define which design is assigned to new forms by default. Independently of this, a different existing design can be selected for each form.
The same design can be used for multiple forms at the same time. Changes to a design template automatically affect all forms to which this design is assigned.
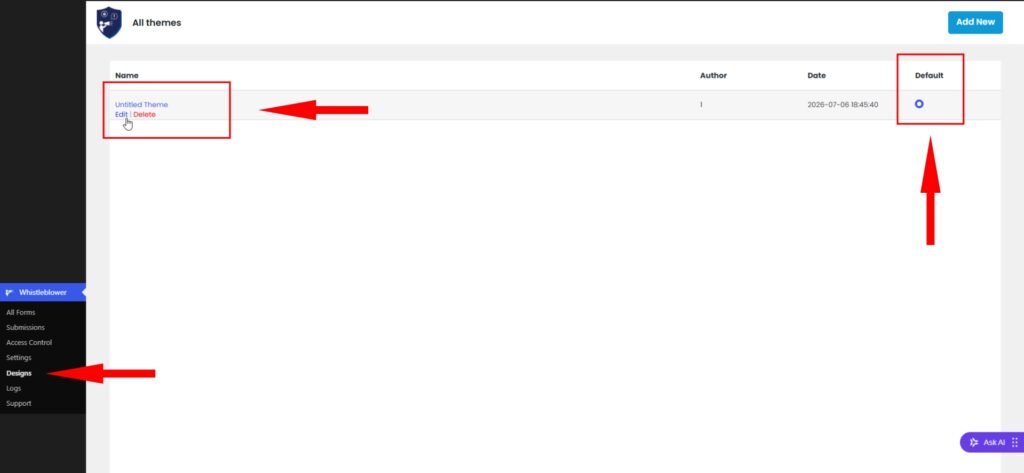
The first screenshot therefore belongs directly after the explanation of the design overview, because “Add New”, “Edit”, “Delete”, and “Default” are visible there.
Edit Design
When editing a design template, an individual “Theme Title” can first be assigned. This is used as an internal label and makes it easier to manage multiple designs, for example “Corporate Black” or “Corporate Blue”.
The design options are divided into different areas: “General”, “Form fields”, “Start Buttons”, “Chat styles”, “Login styles”, and “Pagination styles”. Each area contains the settings for the corresponding part of the form.
Under “General”, the basic settings for the popup and the form container are configured. These include, among other things, the height and width of the container, background colors, borders, spacing, and the display of the overlay.
With “Layout Background Color”, the background color of the overlay behind the opened popup is defined. Its transparency can be set via “Layout Background Color Opacity”. Colors can be defined using hex color values.
Common CSS values such as 20px, 10px 20px, or auto can be used for “Margin” and “Padding”.
Under “General”, an area for custom CSS is also available. The CSS stored there applies only to the respective design template.
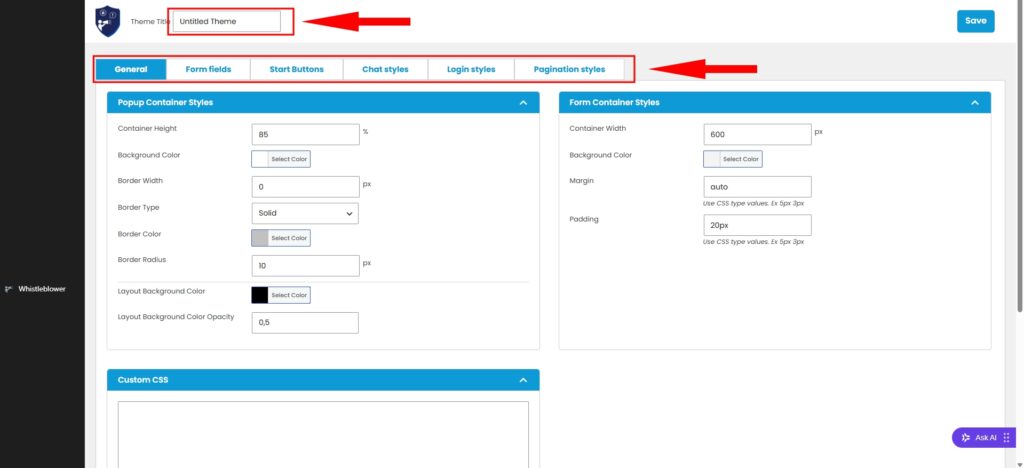
This screenshot belongs here because it shows the actual editing of a design, the individual tabs, popup and form container settings, and “Custom CSS”.
Design changes can be checked directly in the form preview. To apply the changes permanently, the design template must be saved. If a saved change is not visible, the browser cache should be cleared and the page reloaded afterward.
In the free version, only the standard design is available. Creating and using individual designs is part of the PRO version.
Logs
Relevant actions of the Whistleblowing System are logged centrally in the “Logs” area. This allows activities within the plugin to be tracked and filtered or exported if needed.
Logging includes, among other things, the creation of new cases, replies within a case, status changes, the deletion of forms or submissions, and incoming and outgoing webhook activities.
For each log entry, information such as date, form, submission ID, action type, status, a short description of the performed action, and the executing user is displayed. The logs do not contain sensitive content from the submitted cases.
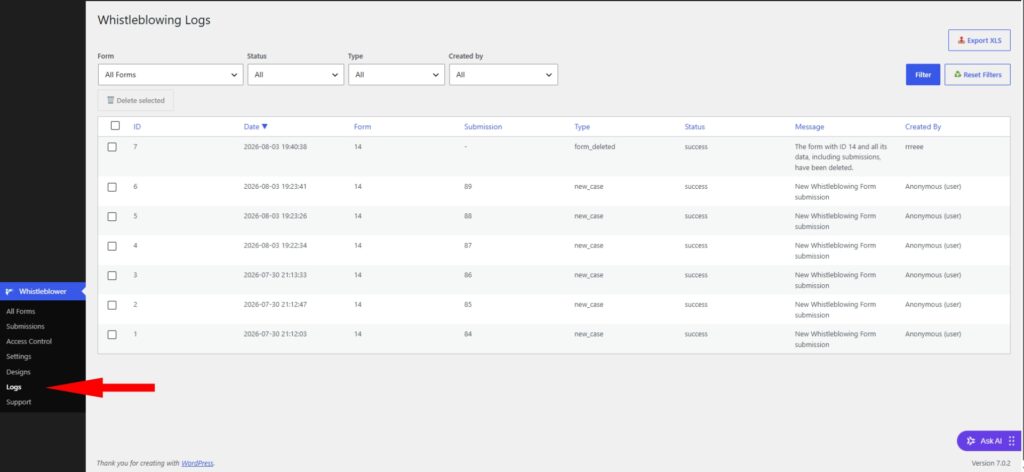
Export Logs
Log entries can be exported via “Export XLS”. If specific entries are selected using the checkboxes, only those entries are exported. If no entry is selected, all log entries are exported.
The Logs function is available in both the free and the PRO version of the plugin.
Filter Logs
Log entries can be filtered specifically by different criteria. Under “Form”, a specific form can be selected. The “Status” filter allows selection between “All”, “Success”, and “Error”. With “Type”, entries can be filtered by the respective logged action.
With “Created by”, entries can additionally be filtered by WordPress users or by the respective trigger of the action. This makes it possible to track who performed a specific action.
The configured filters can be reset via “Reset Filters”.
Delete Log Entries
Individual or multiple log entries can be selected using the checkboxes and manually deleted with “Delete selected”.
In addition, under “Global Settings -> Logs”, you can define after how many days log entries are automatically deleted. If the value is set to 0, no automatic deletion takes place.
Logging itself can be completely disabled in the global settings. In this case, no new log entries are created. Existing logs remain in place.

